OpenVPN server on Fedora 16 connecting Cyanogenmod 7.2.0 [routed]

![OpenVPN server on Fedora 16 connecting Cyanogenmod 7.2.0 [routed]](/content/images/size/w2000/2020/03/openvpn.jpg)
After a new clean install of my home server I thought I'd try a routed OpenVPN setup rather than the bridged type setup [here]. Since there is usually a maximum of 2 concurrent connections to my home server I've never found the need to use a routed setup and found SMB shares were working ok.
Now I've tried a routed setup I can see the benefit in terms of speed and functionality :)
You can read more about the differences on the OpenVPN site: what-is-the-difference-between-bridging-and-routing
This guide was made using a samsung galaxy s2 running cyanogenmod 7.2.0. The server is running Fedora 16 and openvpn 2.2.1. Here's a (very poor) diagram of the setup.

I've also testing this server setup using cyanogenmod 9 nightly and OpenVPN for android which is a new application that makes use of a VPN API added in Android 4.0+. It works very well and this application is very good!
OS/System setup
First off install the required packages
yum install openvpn
Now we need to check ip forwarding is enabled. cat /proc/sys/net/ipv4/ip_forward should return 1 if its already enabled. If it returns 0 run the command below.
echo 1 > /proc/sys/net/ipv4/ip_forward
To make this persist throuhg reboots add net.ipv4.ip_forward = 1 to the /etc/sysctl.conf file
You can also do it by editing /etc/sysctl.conf and adding the following (this is a good thing to do as it will ensure that packet-forwarding persists across reboots):
net.ipv4.ip_forward = 1
Next we need to allow traffic through the servers firewall
iptables -A INPUT -m state –state NEW -m udp -p udp –dport 12345 -j ACCEPT
iptables -A INPUT -i tap+ -p all -j ACCEPT
iptables -A OUTPUT -o tap+ -p all -j ACCEPT
iptables -A FORWARD -i tap+ -j ACCEPT
iptables -A FORWARD -i eth0 -o tap+ -j ACCEPT
iptables -A FORWARD -i eth0 -o tap+ -m state –state ESTABLISHED,RELATED -j ACCEPT
OpenVPN Server
Certificates
Now we need to generate certificates for our server to use. OpenVPN comes with some scripts to take most of the pain out of this. To keep things where I can find them I like to move these to /etc/openvpn/easy-rsa. First off we make a new directory and copy the scripts into it.
mkdir /etc/openvpn/easy-rsa
cd /etc/openvpn
cp -R /usr/share/openvpn/easy-rsa/2.0/* easy-rsa/
cd easy-rsa
Edit the following in the vars file of this directory
export KEY_COUNTRY="UK"
export KEY_PROVINCE="M0"
export KEY_CITY="m00nieTown"
export KEY_ORG="m00nie.co"
export KEY_EMAIL="spam@weeeeeimaspamer.com"
Now just run the following commands
source ./vars ## execute your new vars file
./clean-all  ## Setup the easy-rsa directory (Deletes all keys)
./build-dh  ## takes a while consider backgrounding
./pkitool --initca ## creates ca cert and key
./pkitool --server server ## creates a server cert and key
cd keys
openvpn --genkey --secret ta.key  ## Build a TLS key
sudo cp server.crt server.key ca.crt dh1024.pem ta.key ../../
cd ../..
Server Config File
Now to edit the /etc/openvpn/server.conf file. Mine looks like the following
#################################################
# OpenVPN server config file
# Made using OpenVPN 2.SOMETHING on Fedora 16
#################################################
mode server
tls-server

# Local IP to bind to
local 10.10.10.2 port 12345

# TCP or UDP....Might be worth trying both to check your
# own performance but Id go for UDP first
proto udp

# tun OR tap
# tun = routed
# tap = bridged
dev tun

# Certificate locations
ca ca.crt
cert server.crt
key server.key
dh dh1024.pem

# Configure server mode and supply a VPN subnet
# for OpenVPN to draw client addresses from.
# The server will take 192.168..1.1 for itself,
# the rest will be made available to clients.
# Each client will be able to reach the server
# on 192.168.1.1
server 192.168.1.0 255.255.255.0

# This tells OpenVPN to record IPs given to hosts and
# each time a host will be given the same IP
ifconfig-pool-persist ippool.txt

# Push routes to the client to allow it
# to reach other private subnets behind
# the server. Remember that these
# private subnets will also need
# to know to route the OpenVPN client
# address pool (10.8.0.0/255.255.255.0)
# back to the OpenVPN server.
push "route 10.10.10.0 255.255.255.0"
# Pushing DNS doesn't seem to currently work although
# this requires a script on a non windoes system so I'll
# try sometime :)
# push “dhcp-option DNS 8.8.8.8″

# Allow clients to "see" each other
client-to-client

# Send keep alive every 10s and fail after 120s of no reply
keepalive 10 120

# Configure the (pretty awesome) tls-auth
tls-auth ta.key 0

# Select a cryptographic cipher.
# cipher AES-128-CBC # AES
# cipher DES-EDE3-CBC # Triple-DES
cipher BF-CBC # Blowfish (default)

# Enable compression on the VPN link.
# If you enable it here, you must also
# enable it in the client config file.
comp-lzo

# The maximum number of concurrently connected
# clients we want to allow.
max-clients 5

# It's a good idea to reduce the OpenVPN
# daemon's privileges after initialization.
user nobody
group nobody

# The persist options will try to avoid
# accessing certain resources on restart
# that may no longer be accessible because
# of the privilege downgrade.
persist-key
persist-tun

# Output a short status file showing
# current connections, truncated
# and rewritten every minute.
status openvpn-status.log

# Logging...
log-append openvpn.log

# Set the appropriate level of log
# file verbosity.
# 0 is silent, except for fatal errors
# 4 is reasonable for general usage
# 5 and 6 can help to debug connection problems
# 9 is extremely
verbose verb 4

# Silence repeating messages. At most 20
# sequential messages of the same message
# category will be output to the log.
mute 20
You should be able to run the server with the following command and recieve no errors. If you do fix them first
openvpn --config server.conf --script-security 2
If it all looks good lets make OpenVPN run as a service and start when the server boots
systemctl start openvpn@server.service
systemctl enable openvpn@server.service
Client Setup
Client Certificates
We need to create some certificates for our client (the phone)
cd /etc/openvpn/easy-rsa
Now edit the vars file and change the CN to something unique (this needs done for each cert you generate). Then execute the commands below to create a p12 file. This one file will contain all the certificates the phones needs (although not the ta.key file).
source ./vars
./pkitool --pkcs12 phone
Now I just moved the file to my webserver and browsed there on the phone.
cd keys
mv phone.p12 /var/www/html
Now browse to the file on your phone E.g http://10.10.10.2/phone.p12. Your phone will then store the certificates into is credential store (you might need to set-up a credential store password if you haven't already) :) You can also just copy it to the phones flash and install it from there.
Phone setup
Cyanogenmod 7.2.0 seems to add native TLS-auth support so configure the phone like below:
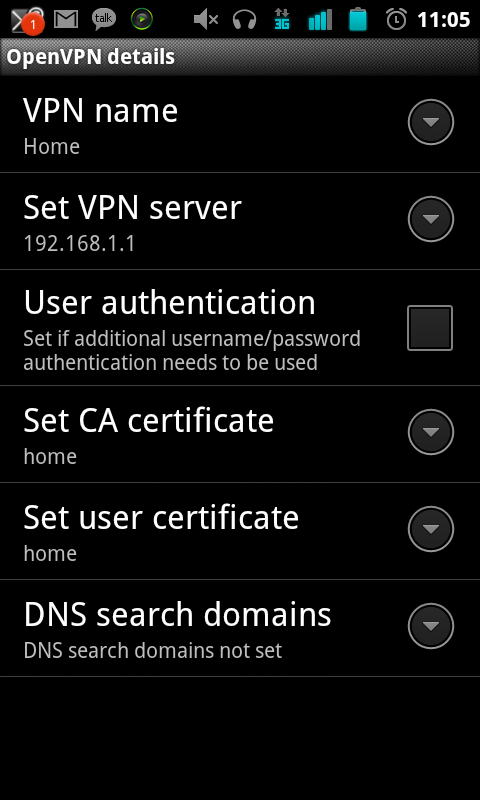
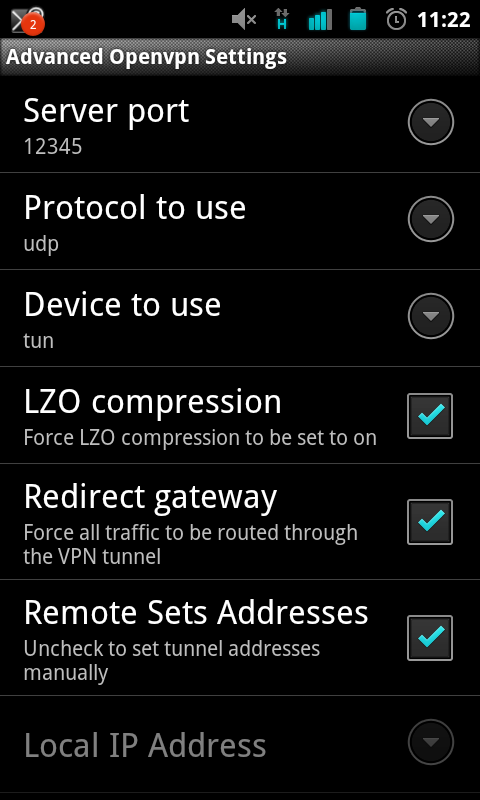
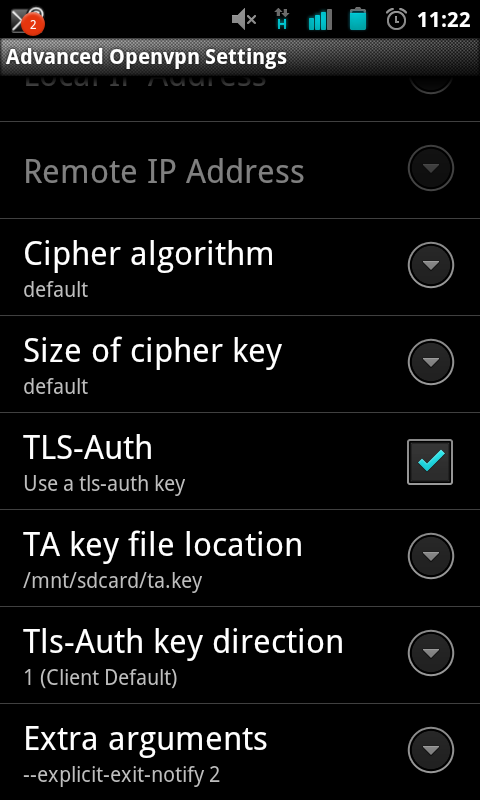
Save the settings and try connecting :D (you may need to forward ports on your router). If you redirect your gateway you may need to change your DNS settings I used Set DNS for this.